Tuesday 26 March 2024

How to install ACDP Module 33 MQB-87 interface board

This post will guide you on how to install the MQB lock fastening (MQB-87) interface board from Yanhua ACDP Module 33.


Here comes the procedure:


1. Push the lock fastening of the interface board to the unlock position.

Find the interface board installation area on the instrument according to the visual positioning mark on the interface board.

how-to-install-acdp-module-33-mqb-87-interface-board-1

2. Place the interface board against the instrument socket and align the pins with the D1 and D4 positioning holes.

how-to-install-acdp-module-33-mqb-87-interface-board-2

3. Check that the D1 and D4 positioning pins are completely aligned with the D1 and D4 positioning holes of the instrument and ensure that the PCB lock buckle is completely aligned.

how-to-install-acdp-module-33-mqb-87-interface-board-3

4. Place your finger on the fingerprint position of the interface board press down on the interface board, and push the PCB lock buckle to the locked position to lock the interface board.


The installation is done.

how-to-install-acdp-module-33-mqb-87-interface-board-4

5. Confirm again that the interface board D1, D2, D3, and D4 positioning pins are completely alignined with the D1, D2, D3, and D4 positioning holes of the instrument.

how-to-install-acdp-module-33-mqb-87-interface-board-5

Video Guide:


www.obd2shop.co.uk

Friday 22 March 2024

How to install ACDP Module 33 MQB thumb screw-fastened (MQB-75) interface board

This post will guide you on how to install the MQB thumb screw-fastened (MQB-75) interface board from Yanhua ACDP Module 33.


Here comes the procedure:


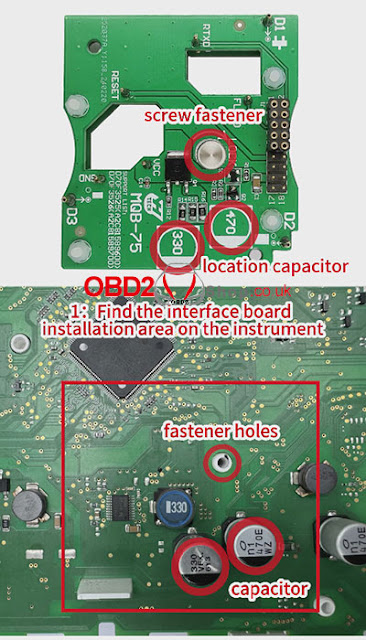
1. Find the interface board installation area on the instrument according to the visual positioning mark on the interface board.

how-to-install-acdp-module-33-mqb-75-interface-board-1

2. Find the correct positioning holes of D1, D2, and D3 on the instrument.

how-to-install-acdp-module-33-mqb-75-interface-board-2

3. Align the interface board with the screw fastener holes and D1, D2, and D3 positioning points.

how-to-install-acdp-module-33-mqb-75-interface-board-3

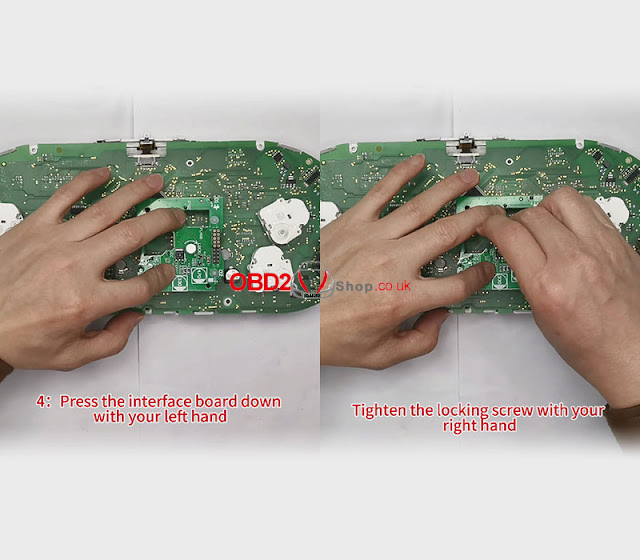
4. Press the interface board down with your left hand, tighten the locking screw with your right hand.

The installation is done.

how-to-install-acdp-module-33-mqb-75-interface-board-4

5. Confirm again that the interface board D1, D2 and D3 positioning pins are completely aligned with the D1, D2 and D3 positioning holes of the instrument.

how-to-install-acdp-module-33-mqb-75-interface-board-5

Video guides:

Wednesday 20 March 2024

How to install ACDP Module 33 MQB lock fastening (MQB-77) interface board

This post will guide you on how to install the MQB lock fastening (MQB-77) interface board from Yanhua ACDP Module 33.


Here comes the procedure:

1. Push the lock fastening of the interface board to the unlock position.

Find the interface board installation area on the instrument according to the visual positioning mark on the interface board.

acdp-module-33-mqb-lock-fastening-interface-board-installation-1

2. Place the interface board against the instrument buzzer and align the pins with the D1 and D4 positioning holes.

acdp-module-33-mqb-lock-fastening-interface-board-installation-2

3. Check that the D1 and D4 positioning pins are completely aligned with the D1 and D4 positioning holes of the instrument and ensure that the PCB lock buckle is completely aligned.

acdp-module-33-mqb-lock-fastening-interface-board-installation-3

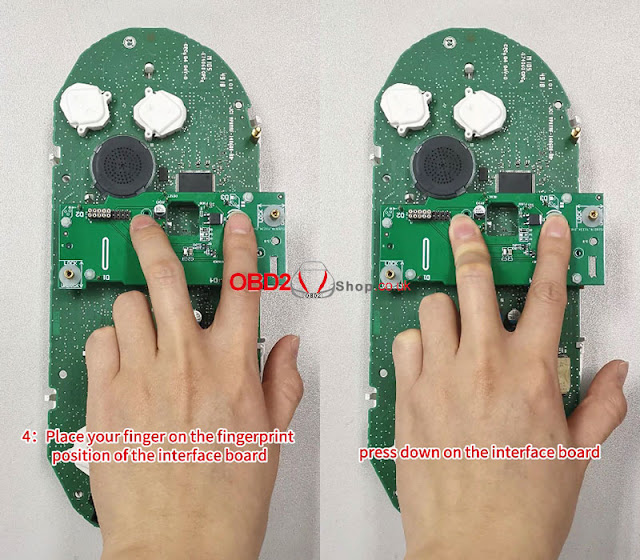
4. Place your finger on the fingerprint position of the interface board

Press down on the interface board.

Push the PCB lock buckle to the Locked position to lock the interface board.

The installation is done.

acdp-module-33-mqb-lock-fastening-interface-board-installation-4

acdp-module-33-mqb-lock-fastening-interface-board-installation-5

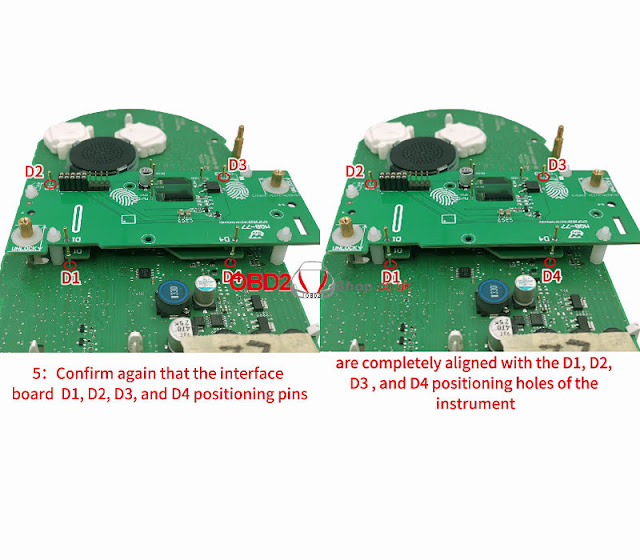
5. Confirm again that the interface board D1, D2, D3, and D4 positioning pins are completely aligned with the D1, D2, D3, and D4 positioning holes of the instrument.

acdp-module-33-mqb-lock-fastening-interface-board-installation-6

Video guides:


www.obd2shop.co.uk