Sunday 28 May 2023

Yanhua Module 30: VW/Audi 0BH Continental Gearbox Mileage Correction

Yanhua Module 30 & Module 30 Authorization has been newly released, which supports doing Volkswagen/ Audi DQ500(0BH Continental) gearbox mileage correction without soldering. Including Audi Q3(before 2016), and VW Multivan/ Tiguan vehicle models.


Users who already have Module 19 or Module 25 can directly purchase the authorization. Other users can just purchase Module 30 to work with the Mini ACDP basic module.


Module 30 Features

1. No soldering, no risk. It supports quickly identifying the vehicle transmission model by OBD without having to remove the computer.

2. It supports adjusting mileage by plugging the special interface board into the car, no need to remove the TCM.


Module 30 Accessories

yanhua-module-30-vw-audi-0bh-continental-gearbox-mileage-correction-(1)

Module 30 APP Operation Steps

Mini ACDP >> VW >> Gearbox mileage correction >> VW/ Audi >> DQ500(0BH CONTINENTAL)

Here allows us to identify, mileage correction(auto mode/single-step mode), time correction(auto mode/single-step mode), read EEPROM, and write EEPROM.

yanhua-module-30-vw-audi-0bh-continental-gearbox-mileage-correction-(2)

yanhua-module-30-vw-audi-0bh-continental-gearbox-mileage-correction-(3)

yanhua-module-30-vw-audi-0bh-continental-gearbox-mileage-correction-(4)

How to connect Module 30?

1. Prepare ACDP, DB15-LAN adapter, interface board, and gearbox.

2. Connect the interface board correctly to the gearbox interface.

3. Short the CAN resistor on the DB15-LAN adapter to the "CAN-R".

4. Connect ACDP, DB15-LAN adapter, interface board, and gearbox.

yanhua-module-30-vw-audi-0bh-continental-gearbox-mileage-correction-(5)

yanhua-module-30-vw-audi-0bh-continental-gearbox-mileage-correction-(6)

www.obd2shop.co.uk

Friday 12 May 2023

Repair BMW FRM module without coding by Yanhua ACDP

This post will guide you on how to use Yanhua Mini ACDP and ACDP Module 8 to repair the BMW FRM module.

Attention: Before purchasing Module 8, make sure you already have ACDP Module 1


Check the required accessories:


BMW FRM Module

ACDP Main unit

OBD+ICP Adapter

20 Pin Cable

FRM interface board

Screws

BDM01 adapter (from module 1)


repair-bmw-frm-module-without-coding-by-acdp-1

Install the support studs

Install the FRM interface board

Note that the test pins of the FRM interface board should be aligned with four test points

repair-bmw-frm-module-without-coding-by-acdp-2

Lock two screws

Connect the BDM01 adapter to the OBP+ICP adapter

Connect the BDM01 adapter to the FRM interface board

Connect to the ACDP

Power up the ACDP host

repair-bmw-frm-module-without-coding-by-acdp-3

repair-bmw-frm-module-without-coding-by-acdp-4

Open the ACDP software

Confirm in the upper right corner that ACDP connected

Click "BMW" >> "FRM"

Select according to the corresponding chip model, here we choose"ICP MC9S12XEQ384 (MASK:3M25J)"

Click FRM data recovery (automatic mode)

repair-bmw-frm-module-without-coding-by-acdp-5

repair-bmw-frm-module-without-coding-by-acdp-6

Confirm that the device and adapter are connected properly

Waiting for pin detection to pass

Click Confirm

repair-bmw-frm-module-without-coding-by-acdp-7

Reading chip data

Check the chip information readout


If 4K EEPROM data is read

The FRM module data is not damaged

Please operate with caution


If 32K Dflash data is read

The FRM module data is corrupt

Click Confirm to continue

repair-bmw-frm-module-without-coding-by-acdp-8

Pay attention to the path to save the file, which includes the date and time


Check the frame number and other information

If the parsed car information is incorrect

Click Cancel to the exit automatic repair

If the information such as the car correct. click confirm


Repairing chip data

Repair completed!

repair-bmw-frm-module-without-coding-by-acdp-9

Check the video to learn more details:

Sunday 7 May 2023

How to Replace Yanhua KVM SPC56B Chip for 2018+ JLR?

RFA Module CPU SPC560B Blank Chip supports programming JPLA, K8D2, and J9C3 initial data with Yanhua Mini ACDP + Module 24 for 2018+ JLR key adding. Removing the RFA module to replace the SPC56B chip for writing data without soldering. This is a tutorial on how to unsolder the KVM SPC56B chip step by step with Yanhua JLR KVM soldering tool kits.


Part1: Remove SPC56B Chip

Check the full video:

It needs to remove the paint and the chip.

1. Apply paint remover to the top of the chip and the pins, you can see the protective paint start to peel off after 30s. apply the paint remover to the pin area. After about the 90s, you can start cleaning the chip with cotton. Then clean the board with contact cleaner to avoid corrosion of the board paint remover. This is the effect after paint removal and cleaning.

replace-yanhua-kvm-spc56b-chip-for-jlr-1

2. Install the chip limit plate, and apply solder paste to the chip pins. Use temperature and airflow adjustable hot air gun to desolder chip. Use a clamp to secure the chip limit plate.

replace-yanhua-kvm-spc56b-chip-for-jlr-2

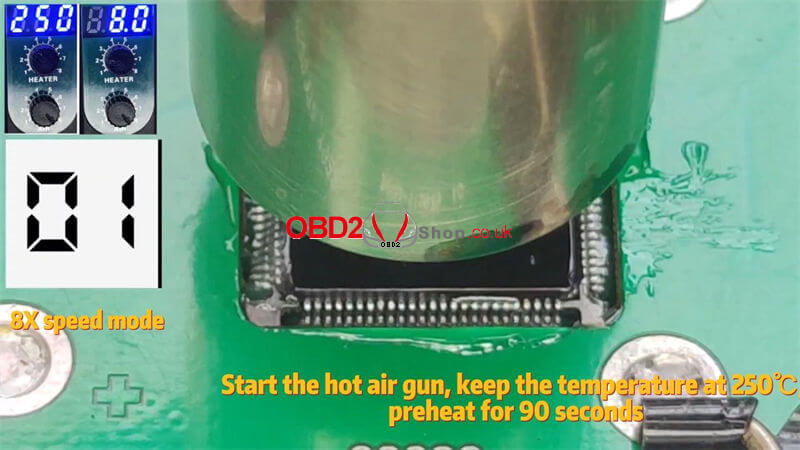
3. Adjust the height of the hot air gun, to 8mm above the chip limit plate. Adjust the air volume to 8 gears. Adjust the preheating temperature to 250℃. Start the hot air gun, keep the temperature at 250℃ preheats for the 90s.

replace-yanhua-kvm-spc56b-chip-for-jlr-3

replace-yanhua-kvm-spc56b-chip-for-jlr-4

4.After 90s, raise the temperature to 420℃ and heat for 25s. at this point, use tweezers to hold one corner of the chip. When the chip is loose, clip up the chip. About 25s, the chip is loose, remove the air gun and clip up the chip.

replace-yanhua-kvm-spc56b-chip-for-jlr-5

replace-yanhua-kvm-spc56b-chip-for-jlr-6

5. Clean the bottom and pins of the chip with paint remover. Then clean the board with contact cleaner to avoid corrosion of the board paint remover. There is the original plate solder on the pad. Please check whether there is a short circuit between the plate.

replace-yanhua-kvm-spc56b-chip-for-jlr-7

Part2: Solder SPC56B Chip

Check the full video:

1. Apply the solder paste to the chip pad, and install the chip limit plate. Use clamps to secure the chip limit plate.

replace-yanhua-kvm-spc56b-chip-for-jlr-8

replace-yanhua-kvm-spc56b-chip-for-jlr-9

2. Please use Yanhua SPC560B Blank Chip, Yanhua has added solder for the chip pin before delivery. Gently place the chip into the chip limit plate. Please note the chip pin direction. The dimple on the chip is pin1. Apply solder paste to the chip pins and the top of the chip. Check that the chips are placed correctly.

replace-yanhua-kvm-spc56b-chip-for-jlr-10

replace-yanhua-kvm-spc56b-chip-for-jlr-11

3. Use temperature and air volume adjustable hot air gun to blow and solder chip. Adjust the height of the hot air gun, to 8mm above the chip limit plate. Adjust the air volume to 8 gears, and adjust the preheating temperature to 250℃. Start the hot air gun, and keep the temperature at 250℃ preheats for the 90s.

4. After 90s, raise the temperature to 340℃ and heat for 25s. You can see that the solder on the pin is starting to merge with the solder on the pad. After 25s, please shut down and remove the gun.

replace-yanhua-kvm-spc56b-chip-for-jlr-12

replace-yanhua-kvm-spc56b-chip-for-jlr-13

5. Use contact cleaner to clean the solder paste on the chip. This is the final result after welding and cleaning.

replace-yanhua-kvm-spc56b-chip-for-jlr-14

www.obd2shop.co.uk


Friday 5 May 2023

BMW E Chassis 8HP EGS ISN refresh by Yanhua ACDP and Module 11

This post will guide you on how to use Yanhua Mini ACDP and ACDP Module 11 to do BMW E chassis 8HP EGS ISN refresh.


Check all the accessories we need:

ACDP main unit

OBP ICP adapter

8HP interface board

20Pin cable


Install the 8HP interface board

Connect the OBP ICP adapter

Short the CAN resistor on the OBP ICP adapter to the"CAN R JOIN" terminal

Connect the ACDP host

Power up the ACDP host

bmw-e-chassis-8hp-egs-isn-refresh-by-acdp-1

bmw-e-chassis-8hp-egs-isn-refresh-by-acdp-2

Open ACDP software

Please confirm the ACDP host is properly connected

Click "BMW">>"EGS">>"8HP ISN Clear (supports E chassis)">>"Clear ISN"

Confirm that the ACDP device is connected to the EGS module, and click "Continue"

bmw-e-chassis-8hp-egs-isn-refresh-by-acdp-3

bmw-e-chassis-8hp-egs-isn-refresh-by-acdp-4

Confirming that EGS supports clearing ISN and ISN not cleared, click "Continue"

Confirm the system programming information

Click continue to start programming the EGS module

The EGS module is being programmed...

ISN data is being cleared...

Clearing ISN data successfully

bmw-e-chassis-8hp-egs-isn-refresh-by-acdp-5

bmw-e-chassis-8hp-egs-isn-refresh-by-acdp-6

Click on the EGS status

Confirm that the ACDP device is connected to the EGS module

Confirm that the ISN has been cleared

bmw-e-chassis-8hp-egs-isn-refresh-by-acdp-7

bmw-e-chassis-8hp-egs-isn-refresh-by-acdp-8

Done!


For more details on the operation, please refer to the following video: